


No more Sphinx: Offline Speech Recognition with Vosk
The CMUSphinx is no more. Is it all over?Not at all! Welcome Vosk. So let's just build something with Vosk and our trusty NLTK, shall we?


The long-lived and long-loved CMU Sphinx, a brainchild of Carnegie Mellon University, is not maintained actively anymore, since 5 years. But does that mean that we need to move to more production-oriented solutions? No, we actually don't. The team CMU Sphinx Project has slowly rolled in a new child project - Vosk.
Note that there are many other production-oriented solutions available (like OpenVINO, Mozilla DeepSpeech, etc.), which are equally as good, if not better at speech recognition. I am focusing on the ease of setup and use. 😅
Okay, I don't know what you are talking about. Please explain more.
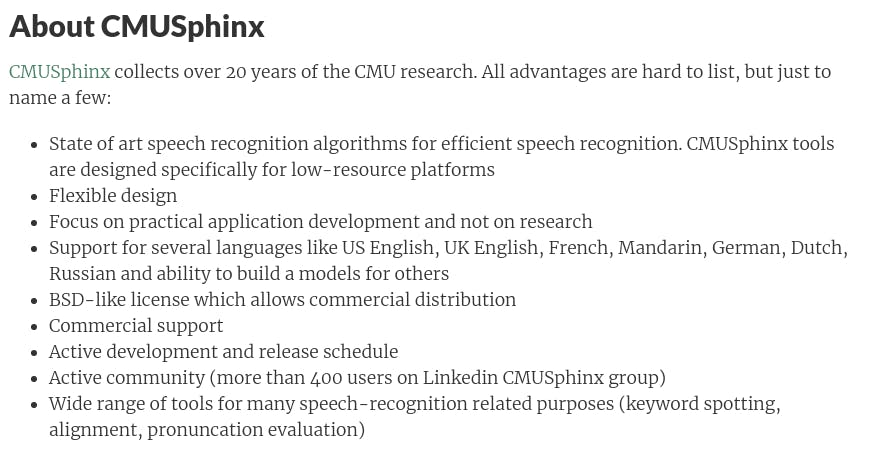
Quoting the Official CMU Sphinx wiki's About section (forgive me for being lazy):
I get it, but why do you call this dead?
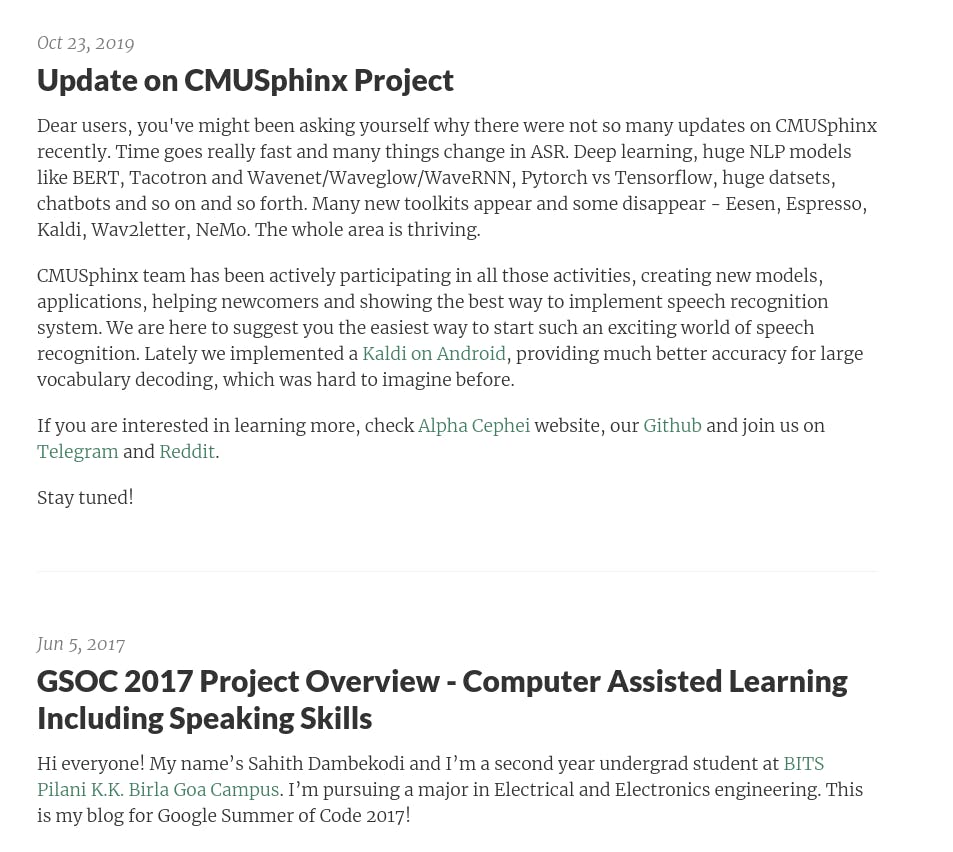
This is the screenshot of the two most recent posts on the CMU Sphinx Official Blog:
Also this discussion from YCombinator:

Even if I disagree with the YCombinator discussion, the official CMU Sphinx blog does little to give me confidence.
Okay I get it. So what now?
Another screenshot from the main CMU Sphinx website :

Not gonna lie, I was pretty disappointed 🙁. I've been a Sphinx user for quite sometime. I'm no researcher, but I was actually familiar with Sphinx. So I wondered how Vosk would do for me. And I was really surprised at the gentle learning curve to implement Vosk to my apps. But there is really less documentation at the time of writing this blog. I hope this post will fill up some of that gap.
Anyways, enough chatter. So in this post, I am going to show you how to setup a simple Python script to recognize your speech, using it alongside NLTK to identify your speech and extract the keywords. The end result? A fully functional system that takes your voice input and processes it reasonably accurately, so that you can add voice control features to any awesome projects you may be building! 😃
Setting up:
Stage 0: Resolving system-level dependencies:
"Know thy tools." ~ Some great person.
Okay so before I start, let's see with what we'll be working on:
- A Linux System (Ubuntu in my case). Windows and Mac users, don't be disheartened - the programming part is the same for all.
- PulseAudio Audio Drivers
- Python 3.8 with pip working.
- A working Internet connection
- An IDE (preferably) (VSCode in my case)
- A microphone (or a headphone or earphone with an attached microphone)
So first, we need to install the appropriate pulseaudio, alsa and jack drivers, among others.
Assuming you're running Debian (or Ubuntu), type the following commands:
sudo apt-get install gcc automake autoconf libtool bison swig python3-dev
sudo apt-get install libpulse-dev jackd libasound2-dev
Note: Don't try to combine the above 2 statements (no pro-gamer move now 😜). libasound2-dev and jackd require swig to build their driver codes.
If you're familiar with CMU Sphinx, you'd realise that there are a lot of common dependencies - which is no coincidence. Vosk comes from Sphinx itself.
If you face some issues with installing swig, don't worry. Just Google your error with the keyword CMU Sphinx.
Stage 1: Setting up Vosk-API
First, we need to download Vosk-API. The Vosk API needs less setup, compared to the original source code.
Assuming you have git installed on your system, enter in your terminal:
git clone https://github.com/alphacep/vosk-api.git
If you don't have git, or have some other issues with it, download Vosk-API from here.
Create a project folder (say speech2command). Download (or clone) the Vosk-api code into a subfolder there.
Now extract the .zip file (or .tar.gz file) into your project folder (if you downloaded the source code as an archive).
Your directory structure should look something like this:
speech2command
     |_______ vosk-api
     |_______ ...
Now we're good to go.
Stage 2: Setting up a language model
The versatility of Vosk (or CMUSphinx) comes from its ability to use models to recognize various languages.
Simply put, models are the parts of Vosk that are language-specific and supports speech in different languages. At the time of writing, Vosk has support for more than 18 languages including Greek, Turkish, Chinese, Indian English, etc.
In this post, we are going to use the small American English model. It's compact (around 40 Mb) and reasonably accurate.
Download the model and extract it in your project folder. Rename the folder you extracted from the .zip file as model. Now, your directory structure should look like this:
speech2command
     |_______ vosk-api
     |_______ model
     |_______ ...
Here is a video walkthrough (albeit a bit old):
Stage 3: Setting up Python Packages
For our project, we need the following Python packages:
- platform
- Speech Recognition
- NLTK
- JSON
- sys
- Vosk
The packages platform, sys and json come included in a standard Python 3 installation. We need to install the other packages manually.
In the command line, type:
pip install nltk speech_recognition vosk
Wait as the components get installed one by one.
Stage 4: Setting up NLTK Packages
Now NLTK is a huge package, with a dedicated index to manage its components. We just downloaded the NLTK core components to get a basic program up and running. We need a few more NLTK components to add to continue with the code.
The required packages are: stopwords, averaged_perceptron_tagger, punkt, and wordnet.
nltk.download("stopwords")
nltk.download("averaged_perceptron_tagger")
nltk.download("punkt")
nltk.download("wordnet")
Or in one line:
nltk.download("stopwords", "averaged_perceptron_tagger", "punkt", "wordnet")
Stage 5: Programming with Vosk and NLTK.
Here comes the fun part! Let's code something in Python to identify speech and convert it to text, using Vosk-API as the backend.
Make a new Python file (say s2c.py) in your project folder. Now the project folder directory structure should look like:
speech2command
     |_______ vosk-api
     |_______ model
     |_______ s2c.py
     |_______ ...
Coding time now! 🤩
Okay, so the code for the project is given below. The code is pretty clean (or so I hope), and you can understand the code yourself (or just copy-paste it 😜).
import platform
import speech_recognition as sr
import nltk
from nltk.stem import WordNetLemmatizer
from nltk.corpus import stopwords, wordnet
import sys
import vosk
import json
from vosk import SetLogLevel

SetLogLevel(-1) # Hide Vosk logs

p = platform.system()


def listen():
    rec = sr.Recognizer()
    with sr.Microphone() as src:
        rec.adjust_for_ambient_noise(src)
        audio = rec.listen(src)
    try:
        cmd = rec.recognize_vosk(audio) # Connecting to Vosk API
    except Exception:
        print("Sorry, couldn't hear. Mind trying typing it?")
        cmd = input()
    return cmd


def pos_tagger(tag):
    if tag.startswith('J'):
        return wordnet.ADJ
    elif tag.startswith('V'):
        return wordnet.VERB
    elif tag.startswith('N'):
        return wordnet.NOUN
    elif tag.startswith('R'):
        return wordnet.ADV
    else:
        return None


def lemmatizer(src):
    w = WordNetLemmatizer()
    pos_tagged = nltk.pos_tag(nltk.word_tokenize(src))
    wn_tagged = list(map(lambda x: (x[0], pos_tagger(x[1])), pos_tagged))
    ls = []  # lemmatized sentence
    for word, tag in wn_tagged:
        if tag is None:
            ls.append(word)
        else:
            ls.append(w.lemmatize(word, tag))
    return ls


def make_tokens(lms):
    stop_words = set(stopwords.words('english')
    src3 = []
    for i in lms:
        if i in stop_words:
            pass
        else:
            src3.append(str(i)+" ")
    print("Keywords are:", end=' ')
    for i in src3:
        print(i, end=' ')


try:
    while True:
        print("\nSay some words: ")
        c = listen()
        print("Listened value=",c)
        d = json.loads(c)
        print("Command =", d["text"])
        if str(d["text"]).rstrip(" ") in ['stop', 'exit', 'bye', 'quit', 'terminate', 'kill', 'end']:
            print("\n\nExit command triggered from command! Exiting...")
            sys.exit()
        lemmatized = lemmatizer(d["text"])
        make_tokens(lemmatized)
except KeyboardInterrupt:
    print("\n\nExit command triggered from Keyboard! Exiting...")
Now run this code, and this will set up a listener that works continuously - with some verbose logs as well - which you can see on your terminal screen. Ignore those logs, they are just for information.
If you need the source code, I made a repo for it: Vosk Demo
Explanation:
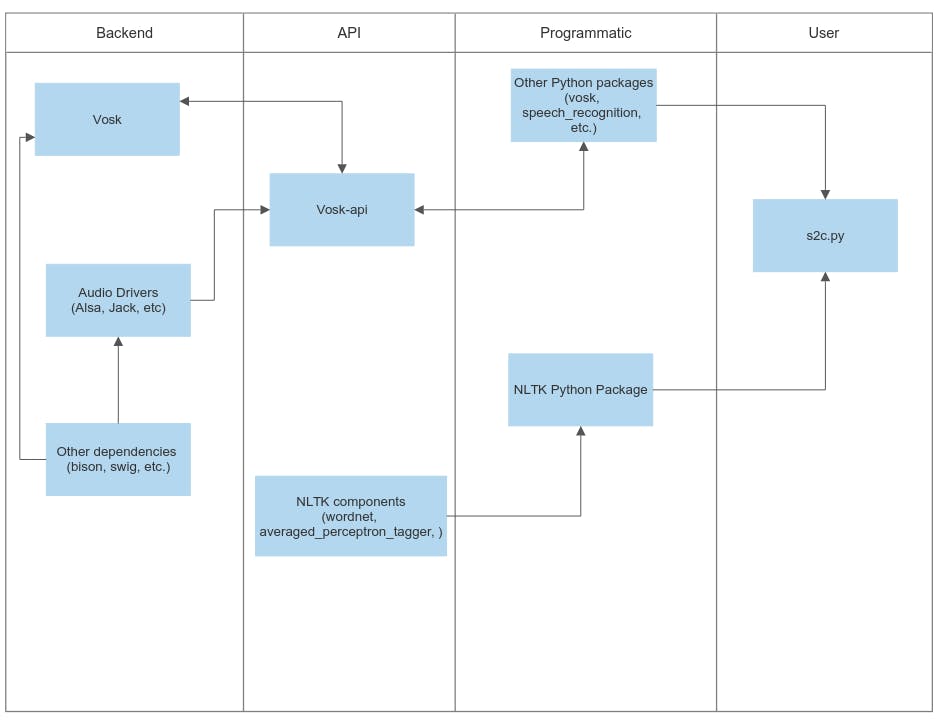
Here is a flowchart that shows exactly how this works:
So this was it, folks! Enjoy your very own speech2text (or rather, speech2command) recognition system. Keep tinkering!
Bye for now!
Ron